Clementine Cake

IMG_6400

Last weekend Christoph and I spent our Saturday night in, which is usually how we spend our Saturday nights anyway. We get up to a lot during the week so we’re usually pretty tired by the end of it. Plus, we’re lazy and it’s winter here in Toronto. As usual we tried to find something good on Netflix and this time it was The Secret Life of Walter Mitty. Usually, I’m not much for Ben Stiller movies since most of them tend to be goofy comedies. Not saying that I lack a sense of humour but I’m more into the dark comedy types. If you’ve seen The Secret Life of Walter Mitty then you’ll know for the most part that the movie isn’t a typical Ben Stiller flick but instead has a lot of great shots and scenes as well as a pretty great story. You’ll also know that this clementine cake plays an important role in the movie.

clemcakeclementine

Ever since I was a child I found that food within movies or stories has always stuck with me. Even if I can’t remember a plot of a movie I always remember the food. As in the chocolate cake from Matilda, a bavarian cream cookie from Stranger Than Fiction, or even the donuts with goose livers from Fantastic Mr. Fox. Yes, I’ve thought about eating donuts with goose livers.

IMG_6422

But back to the cake. This recipe comes from Nigella Lawson’s Clementine Cake which is made from whole clementines and almond flour. It’s naturally gluten free and oil free. To be honest the cake wasn’t exactly what I was looking for and doesn’t exactly match the cake seen in the movie but it’s definitely close. It’s extremely simple to make, has a lovely damp texture, and a very interesting slightly bitter note from the clementine skins. It also gets better the longer you keep it.

Clementine Cake (gluten free, oil free)
Recipe found here

Clementine Icing
Makes enough icing for one cake

1 1/4 to 1 1/2 cups icing sugar
2 TBSP fresh clementine juice
pinch of salt

Mix ingredients together until smooth and quite thick. Smooth on top of the cooled cake and gently push over the sides.

Candied Clementines

1 medium clementine
3 TBSP caster sugar
1 TBSP water

Slice the clementine into thin slices and lay flat in a medium sized pan. Sprinkle over the sugar and water. Bring to a simmer over medium heat and cook for about 5 minutes or until the sugar and water has thickened. Take off the heat and let cool.

IMG_6366

Tagged , , , , , , , , , , , , ,

Roasted Plum and Pumpkin Hand Pies

IMG_6203

Wow! A pumpkin recipe…very original this time of year. But how could I not? I’ve been bombarded with everything pumpkin for the past few weeks now. Pumpkin spice lattes, pumpkin spice Oreos, pumpkin spice everything. I even saw a picture for pumpkin spice tampons, which I’m sure was a joke. There are pumpkins for sale at every store and every corner so naturally I had to pick a few up. I had never actually cooked a fresh pumpkin before but since the little pie pumpkins were only $1.29 each I really couldn’t have gone wrong.

plumsIMG_6142

Since I had some blue plums left over I decided to roast them with a little sugar and make plum pumpkin hand pies. Maybe it sounds like a weird combination but since they’re both in season, why not? It seemed like a great idea to me and also I could’ve called them Plumkin Hand Pies. What a cute name, right? No…no that’s not right. I did a quick google search to see if the name “Plumkin” had been used before, because I was sure it must’ve. Nothing is ever original anymore, especially with the internet. So, my results were not what I was expecting. If you’d like, you can look it up yourself because I don’t think the definition of a “plumkin” is appropriate for a food blog. Unless you like throwing up while looking at pretty pictures of food.

handpiespumpkinplum

Um, so back to the food! These little pies are made with my one and only favourite pie crust, the salted butter pie crust. Which, I really do believe is the key to a good pie, no matter what the filling is. Without this crust all pies are mediocre, in my opinion. Each mini pie gets a dollop of spiced creamy pumpkin puree and half a beautifully dark roasted plum. The filling is a perfect offset to the salted butter crust and the size makes them great for a snack, plus they’re super cute.

Mini Roasted Plum Pumpkin Hand Pies with Salted Butter Crust
Makes 20 2×2″ pies filled with spiced pumpkin and roasted plum

Pumpkin Puree:
1 small pie pumpkin ( or 110g of canned pumpkin puree)
1/2 tsp ground cinnamon
pinch of fresh ground nutmeg
pinch of ground ginger
pinch of salt
2 packed tablespoons of brown sugar

Roasted Plums:
10 small blue/damson plums, halved lengthwise and pitted
3 tbsp caster sugar

Salted Butter Crust:
250g all purpose flour
225g cold, salted butter, cut into small pieces
about 1/4 cup of cold water

1 egg and a little water for egg wash

Preheat oven to 375˚F

Cut off stem and halve pumpkin and scrape out seeds. Rub the inside of the pumpkin with a few drops of vegetable oil. Line a rimmed tray with foil and place pumpkin halves skin side up. Roast in oven for about an hour or until soft.

While the pumpkin is baking, prepare plums. Lay the halves skin side down in a roasting tray and sprinkle sugar evenly over top. Place into oven with the pumpkin and roast for about 15-20 minutes or until juices are bubbling and the plums have softened.

Make the crust by combining the flour and butter in a food processor then adding the water, a little at a time while the machine runs and until the dough starts to come together. Knead lightly by hand. If making by hand, cut the butter into the flour until crumbly. Add the water and mix and form into a dough. Flatten with the palms of your hands and wrap in plastic wrap. Refrigerate until firm, about an hour.

Let plums and pumpkin cool to room temperature. Once the pumpkin has cooled, scrape it out of its skin. Puree in a food processor. I only used about half a cup of puree (110g). The rest of the pumpkin can be used in cakes, pies, cookies, stews, soups, etc. Blend the spices into your half a cup of puree.

Roll out the dough to about 3mm thick and cut out squares with a cookie cutter or with your knife. I made mine with a 2×2″ cutter. Different shapes can be used as well. Gather the scraps and refrigerate while you fill the pies.

To fill the pies, first lay out half the squares and brush the edges with egg wash. Place about a tsp of pumpkin puree into the middle of the square and top with half a roasted plum. Take another square and gently press it between your fingers to make the surface larger. Place it on top of the filling and gently press it down on all sides. Using a fork, seal the edges, either with the tips of the fork or the whole side. Repeat with the rest of the squares. Place onto a parchment lined cookie sheet and repeat with the leftover scraps of dough. Once all the hand pies are ready to be baked, brush with egg wash and bake at 375˚F for approximately 20 minutes or until golden brown.

Can be left at room temperature for a couple days in a sealed container and then refrigerated for about a week. Reheat in low oven.

IMG_6216

Tagged , , , , , , , , , , , , , , , , , , , ,

Zwetschgendatschi. German Plum Cake.

IMG_5962

Want to know what gets me really excited? Getting packages in the mail.

I have a thing for online shopping. That is, when I do shop. I don’t spend a lot of money but when I do get around to making purchases, I find it much more exciting to buy them online. It’s like getting a present in the mail! One might think that ordering items from the comfort of your home is a good way to over spend but I actually think it helps me spend less. The problem with shopping in person is that, for me at least, it tends to lead to impulse buys or buying something I don’t even want at all, mainly because of pressure from sales people or false advertising. No, none of that with online shopping. I get to spend hours and hours comparing prices, reading reviews, and looking for coupon codes. Some people like to call it a waste of time…but I like to call it smart shopping.

blueplumsIMG_5981

Now, that leads me to a package I received in the mail yesterday. Oh how I was excited for this one. I had been waiting a good 6 months for these to go on sale. What are they? Dates! Like, the dates you eat. Those brown little shrivelled things that you find in your supermarket in clear plastic containers next to the produce aisle. Yeah, I know it’s weird that I was excited to order dates online. But these were fresh, just picked dates, soft, moist, and juicy. So it was really disappointing when I finally opened up my first date to take a bite out of it and found a long pale maggot squiggling it’s way out onto my hands. Yup. Maggot.

At first I was completely put off by the thought of eating even one date after that, let alone the full 8 pounds that I had bought. But I guess the fact that they’re organic made up for all the grossness of it. That’s the one thing about organic produce though, you never know what you’re going to get. As well, I think waiting 6 months for a fruit to come into season just to be put off by a little bug is a bit silly.

IMG_5988zwetschgendatschi

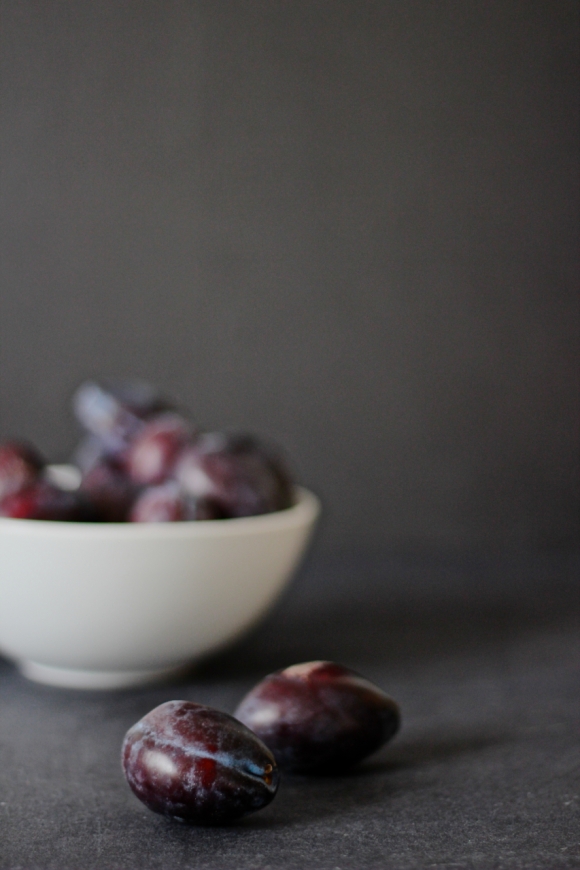
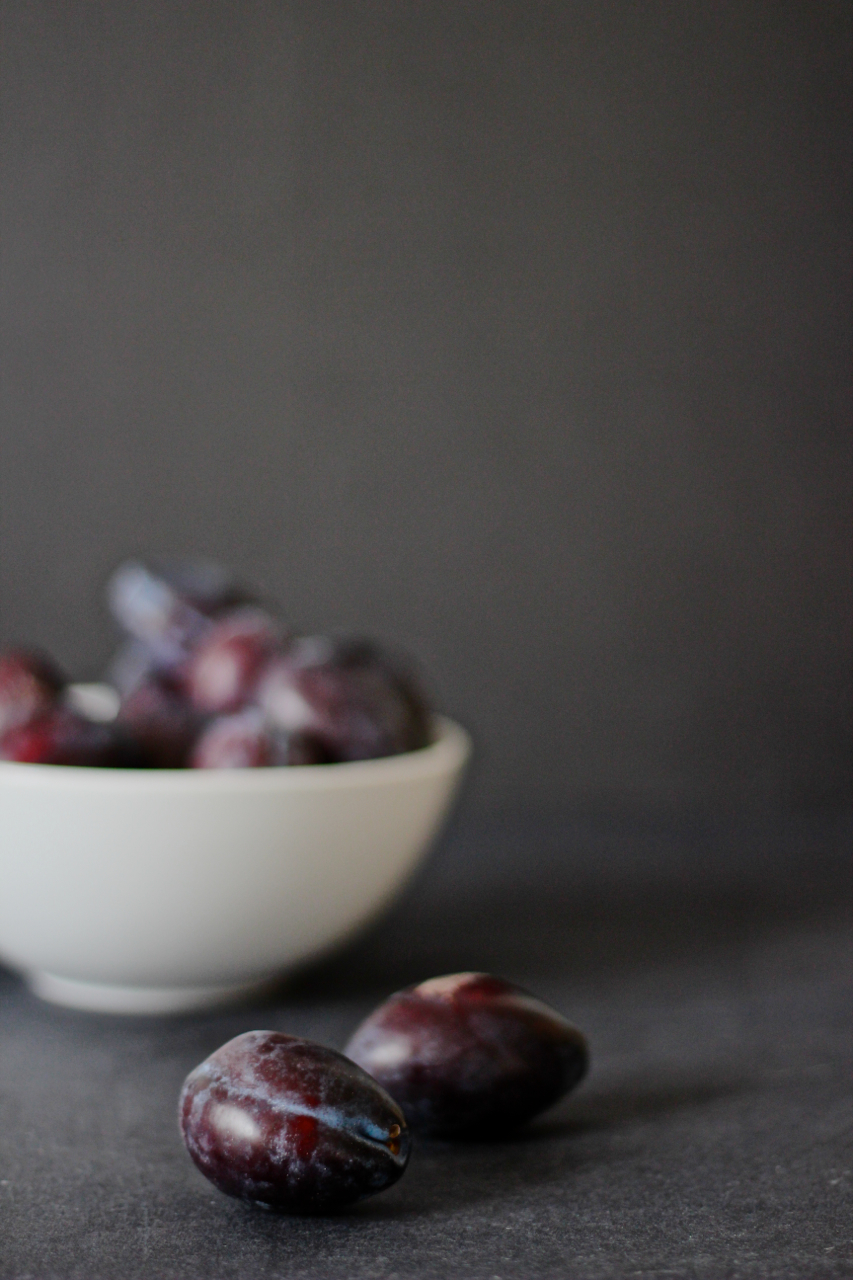
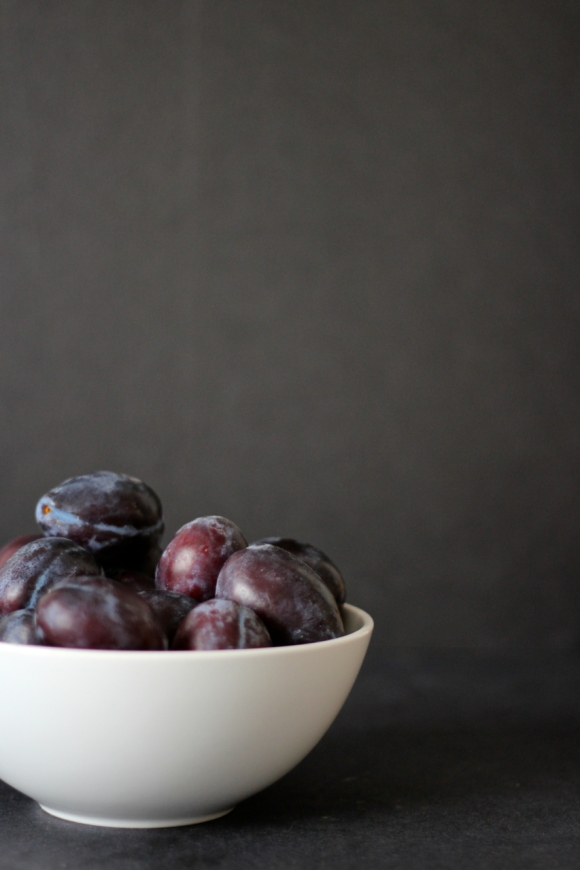
Which now, finally, brings me to this lovely Zwetschgendatschi. Which is really just a long, fancy, German word for “Plum Cake”. However, Zwetschgen are the German name for Blue Plums, also known as Prune Plums or Damson Plums. Correct me if I’m wrong. However, these little, oblong plums only come into season around here during the end of summer and knowing me, I love to buy way too much produce that’s in season because well, my eyes are bigger than my stomach.

IMG_6010

The recipe I have today is a typical recipe for this cake that you can find all over Germany. From what I’ve been told, it’s a popular cake to be had at ‘kaffee und kuchen’ time in Germany. Yes, coffee and cake time, a meal eaten between lunch and dinner, mostly on Sundays or really whenever you feel like coffee and cake. Why don’t we have this in Canada? It seems like it would be a very beneficial meal to get you through the day.

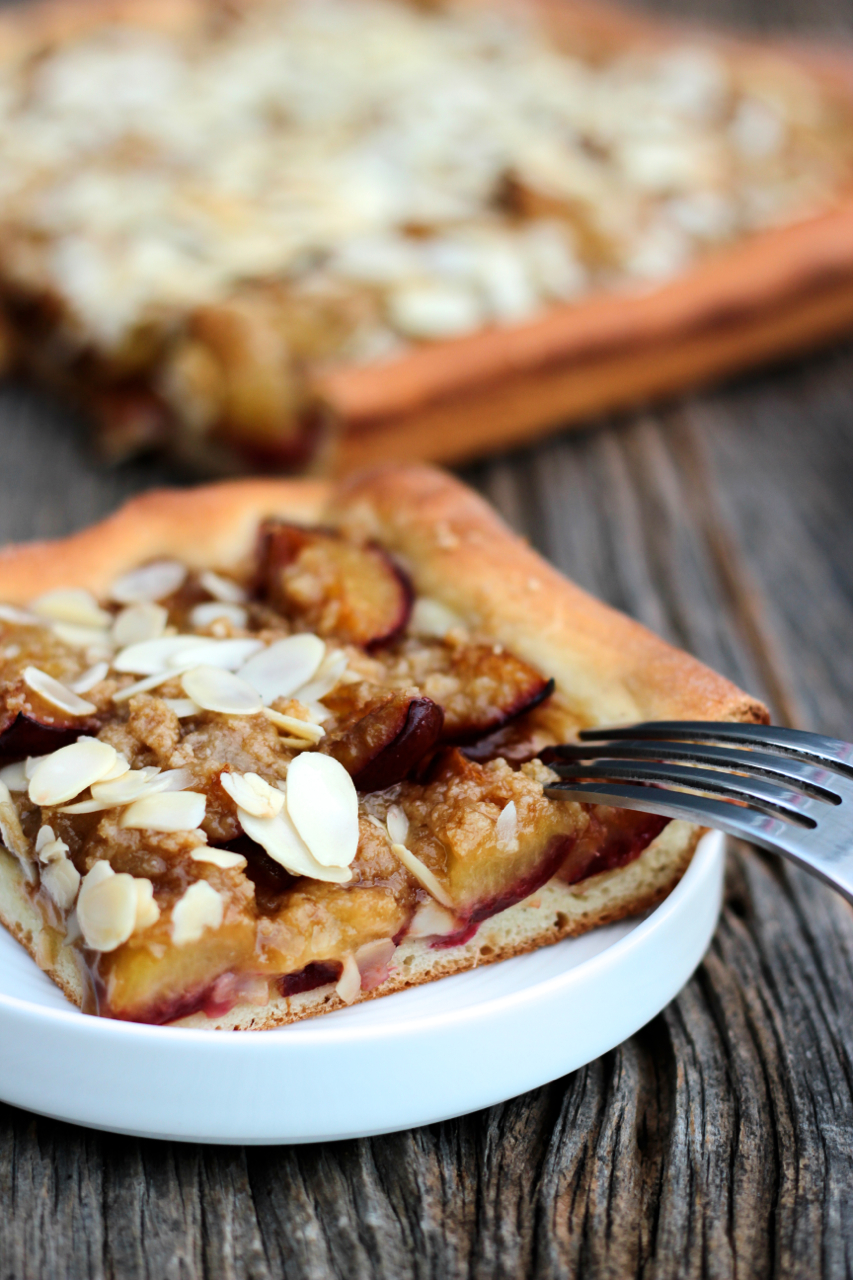
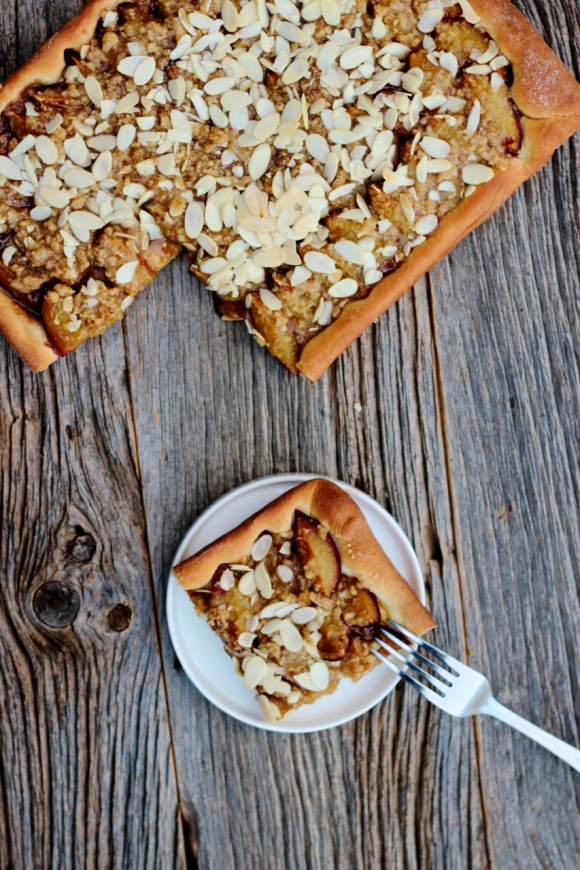
So, back to the actual recipe. This cake isn’t what you’d really think of as a “cake”. The base is made out of a slightly sweet, yeasted dough, topped, with fresh plums, a sprinkling of sliced almonds, and a streusel topping. Also, serving with whipped cream is a must. It’s both light from the tanginess of the plums as well as substantial from the dough. Without the streusel, I’d say would make for a delicious breakfast, whipped cream optional.

IMG_6028IMG_6016

Zwetschgendatschi (German Plum Cake)
Makes about 8 servings
Adapted from Nigella Lawson’s Apple and Blackberry Kuchen and Delicious Days’ Zwetschgendatschi

For the dough:
350g/ 3 cups all purpose flour
50g/ 1/4 cup sugar
1.5 tsp dried yeast
125ml lukewarm milk (2% or Homo)
1 tsp vanilla extract
50g/ 1/4 cup soft salted butter

For the Filling:
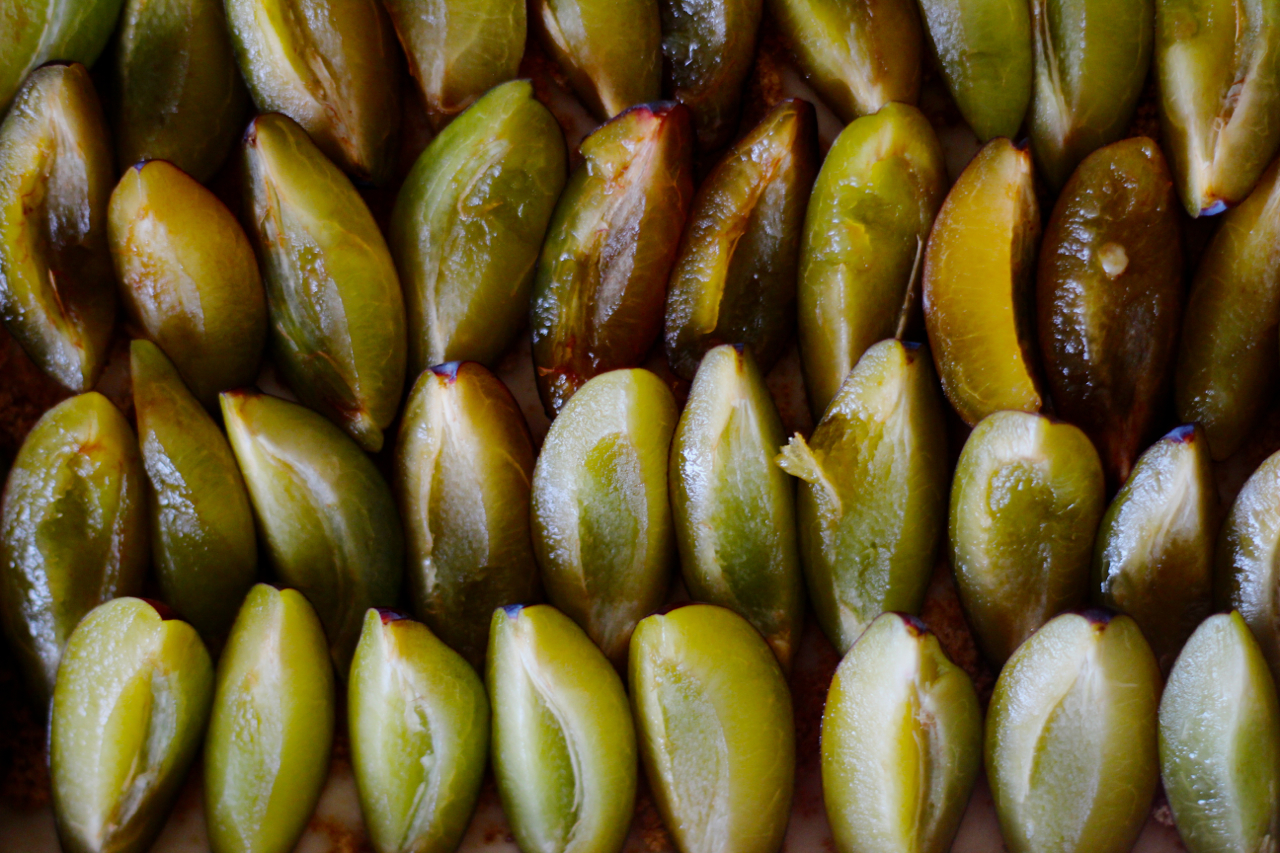
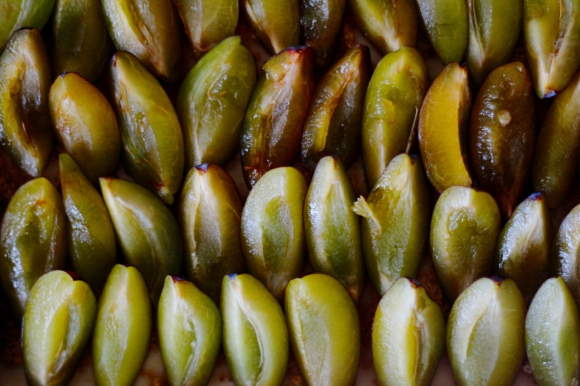
Approximately 25 small Damson Plums or half of that if using regular plums
100g/ 1/2 cup brown sugar
50g/ 1/2 cup slivered almonds

For the Streusel:
50g/ 1/4 cup flour
50g/ 1/4 cup cold, salted butter, diced
50g/ 1/4 cup brown sugar

Cream or egg for egg wash

Line an 8.5 inch x 12 inch tray with a piece of parchment paper. You may also use a slightly bigger tray if that’s what you have.

To make the dough, stir yeast into warmed milk and let stand for a few minutes until foamy. Either using a stand mixer with the dough hook or by hand, combine the flour and sugar in your mixing bowl and stir in milk, eggs, and vanilla. Knead for about 5 minutes with the machine or about 10 by hand on your counter. If the dough is very sticky, add a little more flour, a tbsp at a time. Knead in the softened butter until the dough looks springy and doesn’t stick to the bowl or your hands. Form the dough into a ball and place into a buttered bowl, covered with plastic wrap, in a warm place, to rise for about an hour and a half or until doubled in size.

Meanwhile, prep the plums by slicing them into quarters, lengthwise. Make the streusel topping by combining the 3 ingredients with your fingers until the butter is mixed in well with the flour and sugar, to form a crumbly mix. Refrigerate until ready to use.

Preheat your oven to 350˚F.

Once the dough has doubled in size, punch it down and roll it out to about 1/4 inch thick and slightly larger than your tray. If there is too much dough, just trim off the sides and use the leftover dough another time (I rolled out my extra dough and spread softened butter and sprinkled brown sugar and cinnamon over to make cinnamon buns).

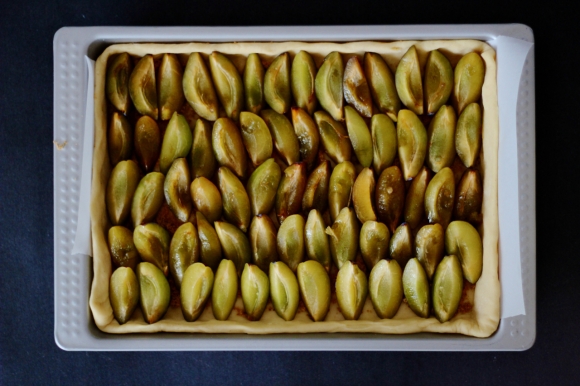
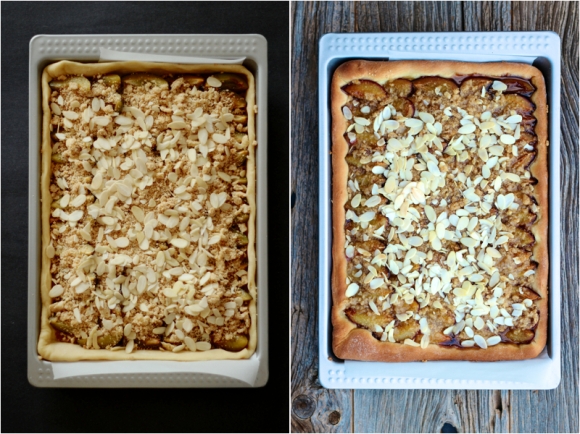
Press the dough into the tray and up the sides. Sprinkle with 1/4 cup of brown sugar and place the plums on top, skin facing down, tightly next to each other. Sprinkle over the remaining 1/4 cup of brown sugar and the streusel topping. Next, sprinkle the slivered almonds over top. Let the Kuchen sit for 15 minutes for the dough to rise a little and then brush with egg wash or cream if you have it.

Bake on the middle rack for about 25 minutes. Check after 20 minutes. If the top is browning too much, cover with a piece of foil.

Enjoy warm with a side of fresh whipped cream.

IMG_5964

Tagged , , , , , , , , , , , , , , , , , ,

Making Peace with Peach Muffins

One thing about moving is that with new apartments also come new neighbours. I’m not sure if it’s us or if we just have really bad luck. But for some reason we’ve had to deal with some really unpleasant neighbours.
peaches
peachmuffins
I’d like to think that Christoph and I are pretty nice and friendly people. But for some odd reason we always seem to have neighbours that dislike us. And they show their distaste for us by leaving their garbage in front of our apartment door or throwing their dug up weeds onto our patio when they think we’re not looking. That’s only half of it. I’m not sure what we’ve done to incur the wrath of our neighbours but it’s starting to make me think that it’s us. Or maybe it’s me.
peachbasket
Anyhow, it’s the end of summer now and every corner store and farmer’s market is over flowing with peaches. So, when I see fresh ripe peaches I have a tendency to buy way more than I know what to do with. This time around, I decided to use them up in a muffin recipe. Together with sour cream, corn meal, and cardamom for added spice I came up with a lightly sweetened breakfast muffin. For a minute there I had the idea of using these muffins as a peace offering to our neighbours. Unfortunately, I’m not THAT nice and I’ll just enjoy my muffins alone.
 
Peach Cardamom Corn Bread Muffins
Makes about 18 regular sized muffins
 
1 cup sour cream
1 cup milk
1/2 cup golden brown sugar to 3/4 cup for sweeter muffins
1 1/4 cup yellow cornmeal
1 tablespoon baking powder
1/4 melted salted butter
1/2 tsp salt
1 tsp ground cardamom
1/2 tsp vanilla extract
1 1/2 cup diced peaches plus more for topping
 
Preheat oven to 400˚F
 
Line a muffin tin with muffin liners, you’ll get approximately 18 muffins.

In a large bowl combine sugar, cornmeal, baking powder, salt, and cardamom. In a mixing jug or small bowl, whisk the sour cream into the milk and add the vanilla, and melted butter. With a wooden spoon, pour the wet ingredients into the dry and mix until lightly combined. Gently fold in the diced peaches. Slice up a few more peaches to get 18 wedges.

Portion the muffin mix between the muffin liners, filling up to approximately 3/4 full. Top each muffin with a peach wedge. Bake for about 20 minutes or until the muffins are golden.
 
IMG_5784
 
 
Tagged , , , , , , , , , , , , ,

Clean Out The Fridge Tacos

IMG_5635
 
People talk. A lot. And when I say ‘talk’ I mean to say that everyone likes to talk about how they are going to do this and that and all the great things that they have planned ahead of them. More often than not most of these intentions don’t pan out or don’t even come close to fruition. That was me. For months and months and even more months I had been telling myself and everyone that I would get back to blogging. I would blame it on my job, that was sucking the life out of me or really I should have blamed it on sheer laziness. Now that I’m jobless I don’t have much of an excuse since being lazy isn’t really a legitimate reason.
 
Just don’t let me get lazy again when I find a new job.
 
IMG_5607
 
So, the past year has been interesting. I was working as an assistant pastry chef and moved twice into new apartments. What a change it has been since moving out of my parents’ place. So much cleaning and so many responsibilities! Who knew that vacuuming and cleaning the bathroom should be done more than once a month…or more than once a week if you’re living with a messy guy.
 
Being responsible for groceries and cooking has really opened my eyes to how much food waste I produce. I seem to have a really hard time with buying just what I need and always end up with half empty containers of food and half rotten vegetables that I had planned to use for some new recipe or other. It also doesn’t help that I tend to only shop when I’m hungry. But it actually makes me feel terrible that I waste so much.
 
IMG_5637
 
The recipe I have today is one of my ways to use up leftovers. Tacos, to me, are great because they can be super simple or as complicated as you want. You can use as little as 3 or 4 ingredients and end up with something that tastes delicious. Here, I wanted to use up some roasted chicken that we had for lunch a few days before as well as some vegetables I had lying around***. From the fridge I pulled out an avocado, some leftover red cabbage, cilantro, and vegan mayo. All that was left was to buy the tortillas and limes. Simple, and much better than wasting perfectly good food.
 
Now I just have to find a way to use up the tortillas and limes…
 
 
*** More often than not I use fake beef for the filling. Yves makes some really good meatless beef tenders that are delicious in tacos when shredded and pan fried.
 
 
Spiced Chicken Tacos with Creamy Lime Aioli  (Can easily be veganized) 
Makes enough for 2 people as a main
 
1 large roasted chicken breast
2 tsp vegetable oil
1/4 of a small head of red/purple cabbage, shredded
1 large avocado
8-10 small tortillas
powdered cayenne pepper
paprika
juice from 1/2 lime
1 lime sliced into quarters
salt
 
For the aioli:
2/3 cup vegan mayo
juice from 1 lime
2 cloves garlic, minced
small handful of cilantro leaves, chopped roughly
 
First make the Aioli:
In a small bowl, stir the lime juice into the vegan mayo and add the minced garlic. Stir until smooth and then add the cilantro. Let it sit while you make the rest of the tacos so that the garlic has time to flavour the dressing.
 
To make the tacos, start by prepping the cabbage, avocado, and limes, and place them into serving dishes or spread out on a large serving tray. Shred the chicken breast by hand. Heat a nonstick pan on medium and coat with the vegetable oil. Add in the chicken shreds and sprinkle the cayenne pepper and paprika over, about 1/2 tsp of each or to taste. Stir fry until the chicken is crisp. Add the lime juice and salt to taste. Transfer to a serving dish.
 
Wipe the pan with a paper towel and turn the heat up to high. Add one tortilla to the pan at a time and toast on each side, about 20 seconds per side or until the tortilla starts to scorch.
 
Serve each taco with some extra cilantro on top as well as a squeeze of lime if desired.
Tagged , , , , , , , , , , , , , , , ,